CrayfishXu

专注Android,填坑铺路

0%

开始

最近又开始折腾了域名、博客、服务器,之前我买的域名是与我的github博客crayfishxu.github.io绑定在一起的,近期搞了好几台免费的甲骨文服务器,没什么需求就不用升级到付费账号。

image-20220523091454886

配置环境

我在每台服务器都装了宝塔面板,这次用两台服务器并使用了甲骨文免费的负载均衡,配置负载均衡需要两台服务器在同一个子网。接着在宝塔中安装Nginx、PHP、mysql,直接一键安装即可。

image-20220523092406397

image-20220523140421698

然后需要将负载平衡器的ip地址与域名绑定,如此访问平衡器的ip或者域名就会将流量均衡到两台服务器了。

image-20220523140949728

如何配置ssl

在监听程序中添加443的端口监听,证书可以宝塔上申请Let’s Encrypt免费证书。

image-20220523141255349

安装WordPress

首先在宝塔上新建“站点”,域名填写IP、域名,两台服务器站点都需要填入域名,数据库可自行选择安装。

image-20220523145301419

新建完“站点”,将下载好的wordpress-5.9.3-zh_CN.zip版本上传至根目录

image-20220523145345152

随后解压文件,把wordpress文件夹下的文件拷贝到根目录,删除wordpress文件夹。

image-20220523145410400

输入域名或ip即可进入安装操作,安装过程中选择配置数据库。

如此之后就可以用ip正常访问了,进入/wp-admin后台,将设置中的站点改成域名。

最近接触了网站的SEO优化相关的知识点,以前只是听过站长,但并不知道站长是干什么的。现在大致明白站长需要维护网站,SEO优化等等。

我的网站

本人建站其实挺早的,2017年就创建了,就是平时写博客比较懒。当初建站的目的是为了记录自己的学习历程,个人站点是通过github来搭建的,配置了自己的域名。

博客

Google收录

Google收录着实是快,只有你会科学上网,登录到 Google Search Console,将自己的网站添加进去。会需要认证,我使用了DNS认证,因为我有域名。

第一步:在你博客的根目录下使用以下命令npm install hexo-generator-sitemap --save

第二步:使用hexo g来生成,会生成一个sitemap.xml文件,接着hexo d上传。

最后添加站点地图收录,真的是秒收。

站点地图

Baidu收录

百度收录真的是慢,我用的普通收录。登录到搜索资源平台,将自己的站点添加上,我用的依旧是DNS认证。

第一步:安装npm install hexo-generator-baidu-sitemap --save

第二步:hexo g生成文件,你会看到baidusitemap.xml,接着hexo d上传。

最后就是通过普通收录加入,但是我到目前还没有收录成功。

百度

最后

收录的sitemap文件中的域名一定要是你添加的站点。本人萌新,刚刚开始学习SEO优化。

自动化解放双手真的很爽,点一下喝杯茶发现一切搞定啦。我使用的服务器系统是Centos 7,使用的打包工具Gitlab CI/CD

开始搞事

  • 准备一台Centos 7服务或者MAC电脑

  • 安装Gitlab runner

    mac环境:

    sudo curl --output /usr/local/bin/gitlab-runner https://gitlab-runner-downloads.s3.amazonaws.com/latest/binaries/gitlab-runner-darwin-amd64

    Centos环境添加runner的源:

    curl -L https://packages.gitlab.com/install/repositories/runner/gitlab-ci-multi-runner/script.rpm.sh | sudo bash

    安装命令:

    yum install gitlab-ci-multi-runner

  • 向Gitlab-CI注册runner

    gitlab-ci-multi-runner register

    正确配置URL、token、description等,executor配置shell。来自于GitLab如图:

    gitlab_runner

    配置完就可以在Gitlab上看到runner

  • 最后部署脚本

    根据不同情况进行脚本修改

    1
    2
    3
    4
    5
    6
    7
    8
    9
    10
    11
    12
    13
    14
    15
    16
    17
    18
    19
    20
    21
    22
    23
    24
    25
    26
    27
    28
    29
    30
    31
    32
    33
    34
    # 就是上文说的stages
    stages:
    - build_debug # 这里就是一个stage,可以定义多个stage,这个stage就是下面的build_debug

    # 构建之前会执行的脚本,这里导入本地的环境变量
    before_script:
    - export ANDROID_HOME=/usr/local/androidSdk
    - export PATH=$PATH:${ANDROID_HOME}/tools
    - export PATH=$PATH:${ANDROID_HOME}/platform-tools
    - chmod +x ./gradlew

    # 声明一个名叫build_debug的构建任务
    build_debug:
    stage: build_debug
    # 构建中,执行一些脚本
    script:
    # - ./gradlew --stacktrace assembleDevelopDebug
    - ./gradlew build
    # 指定监听哪一个分支或什么时候触发Pipeline
    only:
    # - tags #这里tags的作用是当修改gitlab项目tag的时候会触发
    # - test # 监听GitLab的这个分支
    - master
    # 指定由哪一个runner运行
    tags:
    - develop # 这个dev是上文注册Runner时的tag,和注册时候tag一样的话就会用对应的Runner来执行任务
    # 指定成功后应附加到任务的文件和目录的列表
    artifacts:
    paths:
    - app/build/outputs/

    # 构建完成之后执行的脚本
    #after_script:
    # - 这里如果是要配合monkey的话,一般在这个地方执行monkey的脚本

验证搞事成果

正常配置后会显示在gitlab的settings->CI/CD->runners settings中,

gitlab_runner_result1

每次提交后(可以根据only配置触发条件)都会触发打包,打包完成可直接下载。

gitlab_runner_result2

配置环境

首先使用的自动化测试工具是Appium,需要Node.js的开发环境,使用的开发语言是Python。我做的是Android测试,自然还需要Android的环境,JDKAndroid SDK,需要配置环境变量,如何配置请自行百度。可以通过appium-doctor检测是否配置正确,npm命令安装npm install -g appium-doctor,接着执行appium-doctor,appium也可以使用npm install -g appium进行安装。

了解Appium

  • 启动appium桌面版服务

    桌面版操作很简单,启动应用程序后,输入host ip点击start server xxx,如图:

    appium_start

  • 配置变量

    配置如下变量

    1
    2
    3
    4
    5
    6
    7
    8
    9
    'platformName': 'Android'
    'platformVersion': '5.1' # 填写android虚拟机的系统版本 '5.1'
    'deviceName': '21.237.211.97' # 填写安卓虚拟机的设备名称'emulator-5554'
    'appPackage': 'com.wasu.test.ott' # 填写被测试包名 'com.wasu.test.ott'
    "autoLaunch": False #不自动重启launch
    'appActivity': 'com.wasu.plugin.home.ui.HomeMainActivity' # 填写被测试app入口'com.wasu.plugin.home.ui.HomeMainActivity'
    'unicodeKeyboard': True
    'resetKeyboard': True
    "automationName": "UiAutomator2" #"UiAutomator2" 4.4.2版本的用"UiAutomator1"
  • 操作appium桌面版界面

    随后通过start session启动,如图

    appium_start_session

  • 操作appium

    可获取视图中View的idxpath等各种属性

Appium脚本

  • 启动AppiumService

  • 获取webdriver

  • API举例说明

    1. 根据id获取View find_element_by_id

    2. 通过xpath获取View find_elements_by_xpath

    3. 获取当前页面的源 page_source

  • lxml解析page_source的xml树

    例如:

    1
    2
    3
    4
    5
    6
    7
    8
    9
    10
    11
    # 找到视图页面
    pageSource = self.driver.page_source
    n = pageSource.find("\n")+1
    pageXml = pageSource[n:]
    # 转xml tree
    mytree = lxml.etree.XML(pageXml)
    result = mytree.xpath('//*[contains(@text,"错误代码")]')
    for a in result:
    tree = lxml.etree.ElementTree(a)
    xpath = tree.getpath(a)
    view = self.driver1.find_element_by_xpath(xpath)
  • 打包脚本为exe

    1. 安装插件pip install PyInstaller

    2. 使用pyinstaller -F Tools.py

    3. -i xx.ico 增加图标

导出依赖

导出 pip freeze >requirements.txt

安装依赖

安装 pip install -r requirements.txt

时隔近3年没写博客,感觉自己变懒了。这几年间,婚结了,孩子出生了,变化真的好大。我一直从事Android的工作,目前单位工作相对轻松,该是重操旧业的时候了,也想跟大家分享分享自己所学。

独立游戏

独立游戏这几年非常火,游戏的开发工具也越来越多,拥有大量开发者并需要写代码,例如:Unreal、Unity、Cocos Creator、Godot等等;还有很多不需要写代码的开发工具,如:RPG制作大师、唤境等等。我个人目前主要学过Cocos Creator开发,对Unity、Godot也都看好。相信制作游戏是很多热爱游戏人的梦想。

像素画

做游戏当然要学会画画,经过很长时间学习选择,我对像素画也有了深入的了解,并开始“像素画100天”的坚持。我使用过Android手机上的Pixel Studio、dotpict,电脑上使用Aseprite。像素画很有意思,我会坚持的。

Android大屏开发

目前我做的是Android大屏方面的工作,在大屏适配反而不是什么难事了,RecyclerView的使用变的无比寻常,焦点的控制事关重大。有Java为主到Kotlin为主。由各种三方框架组成到Google Jetpack。慢慢的开始正规化。Android源码的阅读一直落下,实在有些枯燥。

Appium自动化测试

想要解放双手,自动化就是最有力的工具;从获取数据,到解析数据;从分析数据,到按逻辑操作。一步一步全面自动化。

结尾

没有结尾

安装Hexo

首先hexo环境部署好,Git、Node必不可少,这个不详细说了。

接着安装hexo的命令

1
npm install hexo-cli -g

或者

1
npm install hexo

安装以后可以使用两种方式执行Hexo:

  1. npx hero <command>

  2. 配置环境变量后使用hexo <command>

1
echo 'PATH="$PATH:./node_modules/.bin"' >> ~/.profil

最后执行init命令初始化Hexo文件夹,以及安装所需插件

1
2
3
$ hexo init <folder>
$ cd <folder>
$ npm install

配置等主题安装完再说明。

Next主题

clone next到hexo init的目录

1
git clone https://github.com/iissnan/hexo-theme-next themes/next

配置

首先hexo的_config.yml配置标题、描述、名字等

参数 描述
title 网站标题
subtitle 网站副标题
description 网站描述
keywords 关键字
author 您的名字
language 语言
timezone 时区
url 网址
permalink 永久链接
permalink_defaults 默认值
pretty_urls.trailing_index 是否保留结尾index.html
new_post_name 新文章的文件名称
theme next

接着Next主题的_config.yml配置

参数 描述
scheme Pisces(不同外观)
language zh-Hans
social 其他社区
links 友链
auto_excerpt 阅读全文
valine 评论 leancloud
leancloud_visitors 阅读数
cursor_effect 按钮特效
live2d 二次元小人

运行命令

  1. 清除 hero clean
  2. 新建文章 hexo new [layout] <title>
  3. 生成文件 hexo generate
  4. 发布服务 hexo server
  5. 上传Git hero deploy

发布服务后遇到的问题

  1. 报错

    “ {% extends ‘_layout.swig‘ %} {% import ‘_macro/post.swig‘ as post_template %}“

  2. 点击栏目提示找不到cannot get about /%20

二次元小人

安装live2d插件

1
npm install --save hexo-helper-live2d

然后到next主题下的_config.yml的配置文件新增

1
2
3
4
5
6
7
8
9
10
11
12
13
14
15
16
17
18
19
20
live2d:
enable: true # 是否启动
scriptFrom: local # 默认
pluginRootPath: live2dw/ # 插件在站点上的根目录(相对路径)
pluginJsPath: lib/ # 脚本文件相对与插件根目录路径
pluginModelPath: assets/ # 模型文件相对与插件根目录路径
tagMode: false # 标签模式, 是否仅替换 live2d tag标签而非插入到所有页面中
debug: false # 调试, 是否在控制台输出日志
model:
use: live2d-widget ## 模型文件
display:
position: right # 定位方向 left right top bottom
width: 150 # 小人宽度
height: 300 # 小人高度
hOffset: -15 # 向 偏移
vOffset: -15 # 像 偏移
mobile:
show: true # 手机端是否显示
react:
opacity: 0.7 # 模型透明度

也可以修改你喜欢的模型

1
2
3
4
5
6
7
8
9
10
11
12
13
14
15
16
17
18
19
20
21
22
live2d-widget-model-chitose
live2d-widget-model-epsilon2_1
live2d-widget-model-gf
live2d-widget-model-haru/01 (use npm install --save live2d-widget-model-haru)
live2d-widget-model-haru/02 (use npm install --save live2d-widget-model-haru)
live2d-widget-model-haruto
live2d-widget-model-hibiki
live2d-widget-model-hijiki
live2d-widget-model-izumi
live2d-widget-model-koharu
live2d-widget-model-miku
live2d-widget-model-ni-j
live2d-widget-model-nico
live2d-widget-model-nietzsche
live2d-widget-model-nipsilon
live2d-widget-model-nito
live2d-widget-model-shizuku
live2d-widget-model-tororo
live2d-widget-model-tsumiki
live2d-widget-model-unitychan
live2d-widget-model-wanko
live2d-widget-model-z16

配置前先安装模型哦

1
npm install npm install --save live2d-widget-model-xxx

雪花飘飘插件

雪花飘飘插件就是我网上找的一个js文件

1
2
3
4
5
6
7
8
9
10
11
12
13
14
15
16
17
18
19
20
21
22
23
24
25
26
27
28
29
30
31
32
33
34
35
36
37
38
39
40
41
42
43
44
45
46
47
48
49
50
51
52
53
54
55
56
57
58
59
60
61
62
63
64
65
66
67
68
69
70
71
72
73
74
75
76
77
78
79
80
81
82
83
84
85
86
87
88
89
90
91
92
93
94
95
96
97
98
99
100
101
102
103
104
105
106
107
108
109
110
111
112
113
114
115
116
117
118
119
120
121
122
123
124
125
126
127
128
/*样式二*/
/* 控制下雪 */
function snowFall(snow) {
/* 可配置属性 */
snow = snow || {};
this.maxFlake = snow.maxFlake || 200; /* 最多片数 */
this.flakeSize = snow.flakeSize || 10; /* 雪花形状 */
this.fallSpeed = snow.fallSpeed || 1; /* 坠落速度 */
}
/* 兼容写法 */
requestAnimationFrame = window.requestAnimationFrame ||
window.mozRequestAnimationFrame ||
window.webkitRequestAnimationFrame ||
window.msRequestAnimationFrame ||
window.oRequestAnimationFrame ||
function(callback) { setTimeout(callback, 1000 / 60); };

cancelAnimationFrame = window.cancelAnimationFrame ||
window.mozCancelAnimationFrame ||
window.webkitCancelAnimationFrame ||
window.msCancelAnimationFrame ||
window.oCancelAnimationFrame;
/* 开始下雪 */
snowFall.prototype.start = function(){
/* 创建画布 */
snowCanvas.apply(this);
/* 创建雪花形状 */
createFlakes.apply(this);
/* 画雪 */
drawSnow.apply(this)
}
/* 创建画布 */
function snowCanvas() {
/* 添加Dom结点 */
var snowcanvas = document.createElement("canvas");
snowcanvas.id = "snowfall";
snowcanvas.width = window.innerWidth;
snowcanvas.height = document.body.clientHeight;
snowcanvas.setAttribute("style", "position:absolute; top: 0; left: 0; z-index: 1; pointer-events: none;");
document.getElementsByTagName("body")[0].appendChild(snowcanvas);
this.canvas = snowcanvas;
this.ctx = snowcanvas.getContext("2d");
/* 窗口大小改变的处理 */
window.onresize = function() {
snowcanvas.width = window.innerWidth;
/* snowcanvas.height = window.innerHeight */
}
}
/* 雪运动对象 */
function flakeMove(canvasWidth, canvasHeight, flakeSize, fallSpeed) {
this.x = Math.floor(Math.random() * canvasWidth); /* x坐标 */
this.y = Math.floor(Math.random() * canvasHeight); /* y坐标 */
this.size = Math.random() * flakeSize + 2; /* 形状 */
this.maxSize = flakeSize; /* 最大形状 */
this.speed = Math.random() * 1 + fallSpeed; /* 坠落速度 */
this.fallSpeed = fallSpeed; /* 坠落速度 */
this.velY = this.speed; /* Y方向速度 */
this.velX = 0; /* X方向速度 */
this.stepSize = Math.random() / 30; /* 步长 */
this.step = 0 /* 步数 */
}
flakeMove.prototype.update = function() {
var x = this.x,
y = this.y;
/* 左右摆动(余弦) */
this.velX *= 0.98;
if (this.velY <= this.speed) {
this.velY = this.speed
}
this.velX += Math.cos(this.step += .05) * this.stepSize;

this.y += this.velY;
this.x += this.velX;
/* 飞出边界的处理 */
if (this.x >= canvas.width || this.x <= 0 || this.y >= canvas.height || this.y <= 0) {
this.reset(canvas.width, canvas.height)
}
};
/* 飞出边界-放置最顶端继续坠落 */
flakeMove.prototype.reset = function(width, height) {
this.x = Math.floor(Math.random() * width);
this.y = 0;
this.size = Math.random() * this.maxSize + 2;
this.speed = Math.random() * 1 + this.fallSpeed;
this.velY = this.speed;
this.velX = 0;
};
// 渲染雪花-随机形状(此处可修改雪花颜色!!!)
flakeMove.prototype.render = function(ctx) {
var snowFlake = ctx.createRadialGradient(this.x, this.y, 0, this.x, this.y, this.size);
snowFlake.addColorStop(0, "rgba(255, 255, 255, 0.9)"); /* 此处是雪花颜色,默认是白色 */
snowFlake.addColorStop(.5, "rgba(255, 255, 255, 0.5)"); /* 若要改为其他颜色,请自行查 */
snowFlake.addColorStop(1, "rgba(255, 255, 255, 0)"); /* 找16进制的RGB 颜色代码。 */
ctx.save();
ctx.fillStyle = snowFlake;
ctx.beginPath();
ctx.arc(this.x, this.y, this.size, 0, Math.PI * 2);
ctx.fill();
ctx.restore();
};
/* 创建雪花-定义形状 */
function createFlakes() {
var maxFlake = this.maxFlake,
flakes = this.flakes = [],
canvas = this.canvas;
for (var i = 0; i < maxFlake; i++) {
flakes.push(new flakeMove(canvas.width, canvas.height, this.flakeSize, this.fallSpeed))
}
}
/* 画雪 */
function drawSnow() {
var maxFlake = this.maxFlake,
flakes = this.flakes;
ctx = this.ctx, canvas = this.canvas, that = this;
/* 清空雪花 */
ctx.clearRect(0, 0, canvas.width, canvas.height);
for (var e = 0; e < maxFlake; e++) {
flakes[e].update();
flakes[e].render(ctx);
}
/* 一帧一帧的画 */
this.loop = requestAnimationFrame(function() {
drawSnow.apply(that);
});
}
/* 调用及控制方法 */
var snow = new snowFall({maxFlake:60});
snow.start();

最后在next/layout/_partials/footer.swig新增一行<script src="/js/cursor/snow.js"></script>就可以了。

点击特效

点击特效和雪花飘飘其实都差不多,附上js代码

1
2
3
4
5
6
7
8
9
10
11
12
13
14
15
16
17
18
19
20
21
22
23
24
25
26
27
28
29
30
31
32
33
34
35
36
37
38
39
40
41
42
43
44
45
46
47
48
49
50
51
52
53
54
55
56
57
58
59
60
61
62
63
64
65
66
67
68
69
70
71
72
73
74
75
76
77
78
79
80
81
82
83
84
85
86
87
88
89
90
91
92
93
94
95
96
97
98
99
100
101
102
103
104
105
106
107
108
109
110
111
112
113
114
115
116
117
118
119
120
121
122
123
124
125
126
127
128
129
130
131
132
133
134
135
136
137
138
139
140
141
142
143
144
145
146
147
148
149
150
151
152
153
154
class Circle {
constructor({ origin, speed, color, angle, context }) {
this.origin = origin
this.position = { ...this.origin }
this.color = color
this.speed = speed
this.angle = angle
this.context = context
this.renderCount = 0
}

draw() {
this.context.fillStyle = this.color
this.context.beginPath()
this.context.arc(this.position.x, this.position.y, 2, 0, Math.PI * 2)
this.context.fill()
}

move() {
this.position.x = (Math.sin(this.angle) * this.speed) + this.position.x
this.position.y = (Math.cos(this.angle) * this.speed) + this.position.y + (this.renderCount * 0.3)
this.renderCount++
}
}

class Boom {
constructor ({ origin, context, circleCount = 16, area }) {
this.origin = origin
this.context = context
this.circleCount = circleCount
this.area = area
this.stop = false
this.circles = []
}

randomArray(range) {
const length = range.length
const randomIndex = Math.floor(length * Math.random())
return range[randomIndex]
}

randomColor() {
const range = ['8', '9', 'A', 'B', 'C', 'D', 'E', 'F']
return '#' + this.randomArray(range) + this.randomArray(range) + this.randomArray(range) + this.randomArray(range) + this.randomArray(range) + this.randomArray(range)
}

randomRange(start, end) {
return (end - start) * Math.random() + start
}

init() {
for(let i = 0; i < this.circleCount; i++) {
const circle = new Circle({
context: this.context,
origin: this.origin,
color: this.randomColor(),
angle: this.randomRange(Math.PI - 1, Math.PI + 1),
speed: this.randomRange(1, 6)
})
this.circles.push(circle)
}
}

move() {
this.circles.forEach((circle, index) => {
if (circle.position.x > this.area.width || circle.position.y > this.area.height) {
return this.circles.splice(index, 1)
}
circle.move()
})
if (this.circles.length == 0) {
this.stop = true
}
}

draw() {
this.circles.forEach(circle => circle.draw())
}
}

class CursorSpecialEffects {
constructor() {
this.computerCanvas = document.createElement('canvas')
this.renderCanvas = document.createElement('canvas')

this.computerContext = this.computerCanvas.getContext('2d')
this.renderContext = this.renderCanvas.getContext('2d')

this.globalWidth = window.innerWidth
this.globalHeight = window.innerHeight

this.booms = []
this.running = false
}

handleMouseDown(e) {
const boom = new Boom({
origin: { x: e.clientX, y: e.clientY },
context: this.computerContext,
area: {
width: this.globalWidth,
height: this.globalHeight
}
})
boom.init()
this.booms.push(boom)
this.running || this.run()
}

handlePageHide() {
this.booms = []
this.running = false
}

init() {
const style = this.renderCanvas.style
style.position = 'fixed'
style.top = style.left = 0
style.zIndex = '999999999999999999999999999999999999999999'
style.pointerEvents = 'none'

style.width = this.renderCanvas.width = this.computerCanvas.width = this.globalWidth
style.height = this.renderCanvas.height = this.computerCanvas.height = this.globalHeight

document.body.append(this.renderCanvas)

window.addEventListener('mousedown', this.handleMouseDown.bind(this))
window.addEventListener('pagehide', this.handlePageHide.bind(this))
}

run() {
this.running = true
if (this.booms.length == 0) {
return this.running = false
}

requestAnimationFrame(this.run.bind(this))

this.computerContext.clearRect(0, 0, this.globalWidth, this.globalHeight)
this.renderContext.clearRect(0, 0, this.globalWidth, this.globalHeight)

this.booms.forEach((boom, index) => {
if (boom.stop) {
return this.booms.splice(index, 1)
}
boom.move()
boom.draw()
})
this.renderContext.drawImage(this.computerCanvas, 0, 0, this.globalWidth, this.globalHeight)
}
}

const cursorSpecialEffects = new CursorSpecialEffects()
cursorSpecialEffects.init()

背景图

修改背景图只需要找到custom.styl文件新增一段css代码就可以了,我直接用bing首页的地址。也可换成动态更新地址background:url(https://source.unsplash.com/random/1600x900);

1
2
3
4
5
6
7
body { 
background: url(https://cn.bing.com///th?id=OHR.Nichinan_ZH-CN9549208263_20x1200.jpg&rf=LaDigue_1920x1200.jpg);
background-repeat: no-repeat;// 设定背景图片非重复填充
background-attachment: fixed;// 设置背景图片不随页面滚动
background-position: 50% 50%;// 设置背景图片位置
background-size: cover//
}

一键部署

使用一键部署,方便快捷部署到git

1
npm install hexo-deployer-git --save

安装完之后修改hexo的_config.yml配置文件

1
2
3
4
5
deploy:
type: git
repo: <repository url> #https://bitbucket.org/JohnSmith/johnsmith.bitbucket.io
branch: [branch]
message: [message]

最后使用上传git命令上传就完成了。

最近接到了阿里的电面,当场被虐的体无完肤,感觉到了自己的弱小,坚定了自己学习的目标,写博加深映像的决心。电面中被问到了Handler的源码,当时回答的不清不楚,只说了Handler中有Message,MessageQueue,Queue,Looper,没有说清楚个所以然,就此有了这篇博文。

源码分析–主线程中的Handler

首先我们在使用时都会在Activitynew Handler()对象,那么进入Handler源码,会看到它有多个构造函数。

1
2
3
4
5
6
7
8
9
10
11
12
13
14
15
16
17
18
19
20
21
22
23
24
25
26
27
public Handler() {
this(null, false);
}
public Handler(Callback callback) {
this(callback, false);
}
public Handler(Callback callback, boolean async) {
if (FIND_POTENTIAL_LEAKS) {
final Class<? extends Handler> klass = getClass();
if ((klass.isAnonymousClass() || klass.isMemberClass() || klass.isLocalClass()) &&
(klass.getModifiers() & Modifier.STATIC) == 0) {
Log.w(TAG, "The following Handler class should be static or leaks might occur: " +
klass.getCanonicalName());
}
}
mLooper = Looper.myLooper();
if (mLooper == null) {
throw new RuntimeException(
"Can't create handler inside thread that has not called Looper.prepare()");
}
mQueue = mLooper.mQueue;
mCallback = callback;
mAsynchronous = async;
}
public static @Nullable Looper myLooper() {
return sThreadLocal.get();
}

这里主要的构造函数实现就是最后一个,在这里获取到了mLooper,mQueue,mCallback对象,但是mLooper,mQueue对象是怎么来的呢?这就涉及到了ActivityThread类了,它在Android的源码中可以找到,它是应用程序的入口,在它的main方法中就启动了一个Handler的UI线程。

1
2
3
4
5
6
7
8
9
10
11
12
13
14
15
16
17
18
19
20
21
22
23
public static void main(String[] args) {
//省略...

Looper.prepareMainLooper();

ActivityThread thread = new ActivityThread();
thread.attach(false);

if (sMainThreadHandler == null) {
sMainThreadHandler = thread.getHandler();
}

if (false) {
Looper.myLooper().setMessageLogging(new
LogPrinter(Log.DEBUG, "ActivityThread"));
}

// End of event ActivityThreadMain.
Trace.traceEnd(Trace.TRACE_TAG_ACTIVITY_MANAGER);
Looper.loop();

throw new RuntimeException("Main thread loop unexpectedly exited");
}

我们看到有Looper.prepareMainLooper();Looper.loop();这两个关键方法,那么进入到Looper找到prepareMainLooper方法以及loop方法。

1
2
3
4
5
6
7
8
9
10
11
12
13
14
15
16
17
18
19
20
21
22
23
24
25
26
27
28
29
30
31
32
33
34
35
36
37
//Looper类
public static void prepareMainLooper() {
prepare(false);
synchronized (Looper.class) {
if (sMainLooper != null) {
throw new IllegalStateException("The main Looper has already been prepared.");
}
sMainLooper = myLooper();
}
}
private static void prepare(boolean quitAllowed) {
if (sThreadLocal.get() != null) {
throw new RuntimeException("Only one Looper may be created per thread");
}
sThreadLocal.set(new Looper(quitAllowed));
}
private Looper(boolean quitAllowed) {
mQueue = new MessageQueue(quitAllowed);
mThread = Thread.currentThread();
}
public static @Nullable Looper myLooper() {
return sThreadLocal.get();
}
//ThreadLocal<T>类
public T get() {
Thread t = Thread.currentThread();
ThreadLocalMap map = getMap(t);
if (map != null) {
ThreadLocalMap.Entry e = map.getEntry(this);
if (e != null) {
@SuppressWarnings("unchecked")
T result = (T)e.value;
return result;
}
}
return setInitialValue();
}

prepareMainLooper这个方法主要去新建了Looper对象加入了sThreadLocal中,Looper实例化时初始化了mQueuemThread,这里使用了同步锁,限制了sMainLooper只有一个。接着我们看myLooper方法,它在默认构造函数里也被调用,意思就是取出当前线程的Looper对象。那么我们可以看出默认构造函数中的mLooper其实就是sMainLoopermQueue就是mLooper中的mQueue
prepareMainLooper方法看完,接着看下面的loop方法,它做了一个死循环,不断的取出MessageQueue中的消息Message进行处理,并把消息发出去,最重要的一句msg.target.dispatchMessage(msg);,就是在分发消息,以后会明白的。

1
2
3
4
5
6
7
8
9
10
11
12
13
14
15
16
17
18
19
20
21
22
23
24
25
26
27
28
29
30
31
32
33
34
35
36
37
38
39
40
41
42
43
44
45
46
47
48
49
50
51
52
53
54
55
56
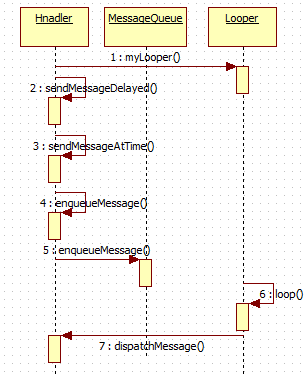
public static void loop() {
final Looper me = myLooper();
if (me == null) {
throw new RuntimeException("No Looper; Looper.prepare() wasn't called on this thread.");
}
final MessageQueue queue = me.mQueue;

// Make sure the identity of this thread is that of the local process,
// and keep track of what that identity token actually is.
Binder.clearCallingIdentity();
final long ident = Binder.clearCallingIdentity();

for (;;) {
Message msg = queue.next(); // might block
if (msg == null) {
// No message indicates that the message queue is quitting.
return;
}

// This must be in a local variable, in case a UI event sets the logger
final Printer logging = me.mLogging;
if (logging != null) {
logging.println(">>>>> Dispatching to " + msg.target + " " +
msg.callback + ": " + msg.what);
}

final long traceTag = me.mTraceTag;
if (traceTag != 0 && Trace.isTagEnabled(traceTag)) {
Trace.traceBegin(traceTag, msg.target.getTraceName(msg));
}
try {
msg.target.dispatchMessage(msg);
} finally {
if (traceTag != 0) {
Trace.traceEnd(traceTag);
}
}

if (logging != null) {
logging.println("<<<<< Finished to " + msg.target + " " + msg.callback);
}

// Make sure that during the course of dispatching the
// identity of the thread wasn't corrupted.
final long newIdent = Binder.clearCallingIdentity();
if (ident != newIdent) {
Log.wtf(TAG, "Thread identity changed from 0x"
+ Long.toHexString(ident) + " to 0x"
+ Long.toHexString(newIdent) + " while dispatching to "
+ msg.target.getClass().getName() + " "
+ msg.callback + " what=" + msg.what);
}

msg.recycleUnchecked();
}
}

接着我们在主线程使用Handler发送一个消息,一般会调用post或者postDelayed方法,然后就看看这几个方法。

1
2
3
4
5
6
7
8
public final boolean post(Runnable r)
{
return sendMessageDelayed(getPostMessage(r), 0);
}
public final boolean postDelayed(Runnable r, long delayMillis)
{
return sendMessageDelayed(getPostMessage(r), delayMillis);
}

看到这里它们调用了同一个sendMessageDelayed方法,第一个参数还调用了getPostMessage方法,接着跟进。

1
2
3
4
5
6
7
8
9
10
11
12
13
14
private static Message getPostMessage(Runnable r) {
Message m = Message.obtain();
m.callback = r;
return m;
}

public final boolean sendMessageDelayed(Message msg, long delayMillis)
{
if (delayMillis < 0) {
delayMillis = 0;
}
return sendMessageAtTime(msg, SystemClock.uptimeMillis() + delayMillis);
}

这里的getPostMessage方法很重要,它实例化了一个Message对象,将线程r赋给了m.callback对象,也就是Message对象中加入了Runnable对象,接着看sendMessageDelayed方法中的代码,最终进入sendMessageAtTime方法。

1
2
3
4
5
6
7
8
9
10
11
12
13
14
15
16
17
public boolean sendMessageAtTime(Message msg, long uptimeMillis) {
MessageQueue queue = mQueue;
if (queue == null) {
RuntimeException e = new RuntimeException(
this + " sendMessageAtTime() called with no mQueue");
Log.w("Looper", e.getMessage(), e);
return false;
}
return enqueueMessage(queue, msg, uptimeMillis);
}
private boolean enqueueMessage(MessageQueue queue, Message msg, long uptimeMillis) {
msg.target = this;
if (mAsynchronous) {
msg.setAsynchronous(true);
}
return queue.enqueueMessage(msg, uptimeMillis);
}

这里MessageQueue来自与默认构造函数中的mQueue,这里msg.target = this;赋值也就是自身Handler,那么之前说到的在loop方法中的msg.target.dispatchMessage(msg),也就是调用了Handler中的dispatchMessage方法,接着我们先跟进MessageQueue类的enqueueMessage方法。

1
2
3
4
5
6
7
8
9
10
11
12
13
14
15
16
17
18
19
20
21
22
23
24
25
26
27
28
29
30
31
32
33
34
35
36
37
38
39
40
41
42
43
44
45
46
47
48
49
50
51
52
53
boolean enqueueMessage(Message msg, long when) {
if (msg.target == null) {
throw new IllegalArgumentException("Message must have a target.");
}
if (msg.isInUse()) {
throw new IllegalStateException(msg + " This message is already in use.");
}

synchronized (this) {
if (mQuitting) {
IllegalStateException e = new IllegalStateException(
msg.target + " sending message to a Handler on a dead thread");
Log.w(TAG, e.getMessage(), e);
msg.recycle();
return false;
}

msg.markInUse();
msg.when = when;
Message p = mMessages;
boolean needWake;
if (p == null || when == 0 || when < p.when) {
// New head, wake up the event queue if blocked.
msg.next = p;
mMessages = msg;
needWake = mBlocked;
} else {
// Inserted within the middle of the queue. Usually we don't have to wake
// up the event queue unless there is a barrier at the head of the queue
// and the message is the earliest asynchronous message in the queue.
needWake = mBlocked && p.target == null && msg.isAsynchronous();
Message prev;
for (;;) {
prev = p;
p = p.next;
if (p == null || when < p.when) {
break;
}
if (needWake && p.isAsynchronous()) {
needWake = false;
}
}
msg.next = p; // invariant: p == prev.next
prev.next = msg;
}

// We can assume mPtr != 0 because mQuitting is false.
if (needWake) {
nativeWake(mPtr);
}
}
return true;
}

这里是在做一个消息的处理,将Message对象加入到MessageQueue对链表中,那么疑问消息怎么发出去的呢?接下来会想起loop循环,就是msg.target.dispatchMessage(msg)将消息发出去的。我们就去查看Handler中的dispatchMessage方法。

1
2
3
4
5
6
7
8
9
10
11
12
13
14
15
16
17
18
public void dispatchMessage(Message msg) {
if (msg.callback != null) {
handleCallback(msg);
} else {
if (mCallback != null) {
if (mCallback.handleMessage(msg)) {
return;
}
}
handleMessage(msg);
}
}

private static void handleCallback(Message message) {
message.callback.run();
}
public void handleMessage(Message msg) {
}

如果msg.callback不为null,就会使用前面提到的getPostMessage中的r,之后就会调用message.callback.run();将消息发出去;否则判断mCallback对象是不是null,如果不是null,就会调用默认Callback接口中的handleMessage,否则就会调用Handler默认的handleMessage方法是个空方法。

总结

整个流程大致就是这样,Message是消息,MessageQueue是消息链表,Looper是处理消息,简单的绘制了时序图,如有错误谢谢提出。
handler

最近想起IPC机制来,感觉还是有些会不记得,于是写下这篇文章,希望自己能牢牢的记住。

简介

IPC拼写是Inter-Process Communication。含义是进程间通信或者跨进程通信,通俗的说就是两个进程之间进行数据交换。

Android中的多进程模式

  • 如果设置多进程?
    设置多进程很简单,在AndroidManifest.xml的<activity>标签下加android:process,虽然设置很简单,但是涉及的东西缺很多。
    比如会造成一下几个问题
  1. 静态变量和单例模式完全失效
  2. 线程同步机制完全失效
  3. SharePreferences的可靠性下降
  4. Application多次被创建

    IPC机制概念

  • Serializable接口
    对象的序列化和反序列化。采用ObjectOutputStreamObjectInputStream将对象序列化到文件或者反序列化读取文件。

    1
    2
    3
    public class User implements Serializable{
    private static final long seriaVersionUID = 1L;
    }
  • Parcelable接口
    Parcel内部包装了可序列化数据,可通过Binder进行传输,在Android中进程间通信使用消耗更少。

  • IPC的几种方式

1.使用Bundle
大多数都是使用Intent传递Bundle数据,实现进程间通信。
2.使用文件共享
两个进程读写同一文件实现进程间通信。
3.使用Messenger
使用Messenger和Message进行进程间通信。
4.使用AIDL
远程调用服务跨进程通信。
5.使用ContentProvider
Android提供的专门用于不同应用进行数据共享的方式。
6.使用Socket
网络通信方式

  • Binder 连接池的使用
    通过BinderPool获取到不同类型的Binder,再进行调用。

注:后期增加IPC方式的代码。

总结

2017已经结束了,这一年里博文发的不是很多,对大家有用的也不多。也在不断的提升自己,学了很多基础的东西,看了HenCoder的自定义View,填补了我对自定义View的一些空白;看了郭神的Glide系列,让我对Glide有了全新的认识,不过还是有很多不懂的还得细读。让我对源码分析有了更多的信心,我也试着啃了“Activity的启动流程”。之前对看书没什么兴趣,现在看了任玉刚《Android开发艺术探索》,觉得看一本好书是能吸取到很多养分的。这一年我买了域名弄了自己的博客,也算一种对自己的督促。 总的来说,这一年有成长、有收获,在前进。

展望

2018来了,新的一年里希望工作有一个新的开始,自己的技术有新的提升,在做的小程序和公众号一直被自己给拖慢了进度,2018还是的好好的去实现它们。最后希望新的一年有新收获。

博客地址

简书 小专栏 个人博客 CSDN

前言

紧跟上一篇,东西之前就写好了,由于忙着忘了发了,接下来继续我们Activity启动流程。

正文

上次分析到调用了AMS(AndroidManagerService)中的startActivity

1
2
3
4
5
6
7
8
@Override
public final int startActivity(IApplicationThread caller, String callingPackage,
Intent intent, String resolvedType, IBinder resultTo, String resultWho, int requestCode,
int startFlags, ProfilerInfo profilerInfo, Bundle bOptions) {
return startActivityAsUser(caller, callingPackage, intent, resolvedType, resultTo,
resultWho, requestCode, startFlags, profilerInfo, bOptions,
UserHandle.getCallingUserId());
}

之后经历了startActivityAsUser

1
2
3
4
5
6
7
8
9
10
11
12
@Override
public final int startActivityAsUser(IApplicationThread caller, String callingPackage,
Intent intent, String resolvedType, IBinder resultTo, String resultWho, int requestCode,
int startFlags, ProfilerInfo profilerInfo, Bundle bOptions, int userId) {
enforceNotIsolatedCaller("startActivity");
userId = mUserController.handleIncomingUser(Binder.getCallingPid(), Binder.getCallingUid(),
userId, false, ALLOW_FULL_ONLY, "startActivity", null);
// TODO: Switch to user app stacks here.
return mActivityStarter.startActivityMayWait(caller, -1, callingPackage, intent,
resolvedType, null, null, resultTo, resultWho, requestCode, startFlags,
profilerInfo, null, null, bOptions, false, userId, null, null);
}

接着调用了mActivityStarter(ActivityStarter)的startActivityMayWait

1
2
3
4
5
6
7
8
9
10
11
12
13
14
15
16
17
18
19
20
21
22
23
24

final int startActivityMayWait(IApplicationThread caller, int callingUid,
String callingPackage, Intent intent, String resolvedType,
IVoiceInteractionSession voiceSession, IVoiceInteractor voiceInteractor,
IBinder resultTo, String resultWho, int requestCode, int startFlags,
ProfilerInfo profilerInfo, IActivityManager.WaitResult outResult, Configuration config,
Bundle bOptions, boolean ignoreTargetSecurity, int userId,
IActivityContainer iContainer, TaskRecord inTask) {
...省略
final ActivityRecord[] outRecord = new ActivityRecord[1];
int res = startActivityLocked(caller, intent, ephemeralIntent, resolvedType,
aInfo, rInfo, voiceSession, voiceInteractor,
resultTo, resultWho, requestCode, callingPid,
callingUid, callingPackage, realCallingPid, realCallingUid, startFlags,
options, ignoreTargetSecurity, componentSpecified, outRecord, container,
inTask);

Binder.restoreCallingIdentity(origId);

...省略
return res;
}
}

紧接着找到正确的调用startActivityLocked

1
2
3
4
5
6
7
8
9
10
11
12
13
final int startActivityLocked(IApplicationThread caller, Intent intent, Intent ephemeralIntent,
String resolvedType, ActivityInfo aInfo, ResolveInfo rInfo,
IVoiceInteractionSession voiceSession, IVoiceInteractor voiceInteractor,
IBinder resultTo, String resultWho, int requestCode, int callingPid, int callingUid,
String callingPackage, int realCallingPid, int realCallingUid, int startFlags,
ActivityOptions options, boolean ignoreTargetSecurity, boolean componentSpecified,
ActivityRecord[] outActivity, ActivityStackSupervisor.ActivityContainer container,
TaskRecord inTask) {
...
doPendingActivityLaunchesLocked(false);
...
return err
}

找正确的点之后继续跟进doPendingActivityLaunchesLocked

1
2
3
4
5
6
7
8
final void doPendingActivityLaunchesLocked(boolean doResume) {
...
if (mDoResume) {
mSupervisor.resumeFocusedStackTopActivityLocked();
}
...
return START_SUCCESS;
}

mSupervisor即ActivityStackSupervisor类型调用了resumeFocusedStackTopActivityLocked,

1
2
3
boolean resumeFocusedStackTopActivityLocked() {
return resumeFocusedStackTopActivityLocked(null, null, null);
}
1
2
3
4
5
6
7
8
9
10
11
boolean resumeFocusedStackTopActivityLocked(
ActivityStack targetStack, ActivityRecord target, ActivityOptions targetOptions) {
if (targetStack != null && isFocusedStack(targetStack)) {
return targetStack.resumeTopActivityUncheckedLocked(target, targetOptions);
}
final ActivityRecord r = mFocusedStack.topRunningActivityLocked();
if (r == null || r.state != RESUMED) {
mFocusedStack.resumeTopActivityUncheckedLocked(null, null);
}
return false;
}

之后又调用了ActivityStack类型mFocusedStack的resumeTopActivityUncheckedLocked方法

1
2
3
4
5
6
7
8
9
10
11
12
13
14
15
16
17
18
19
20
boolean resumeTopActivityUncheckedLocked(ActivityRecord prev, ActivityOptions options) {
if (mStackSupervisor.inResumeTopActivity) {
// Don't even start recursing.
return false;
}

boolean result = false;
try {
// Protect against recursion.
mStackSupervisor.inResumeTopActivity = true;
if (mService.mLockScreenShown == ActivityManagerService.LOCK_SCREEN_LEAVING) {
mService.mLockScreenShown = ActivityManagerService.LOCK_SCREEN_HIDDEN;
mService.updateSleepIfNeededLocked();
}
result = resumeTopActivityInnerLocked(prev, options);
} finally {
mStackSupervisor.inResumeTopActivity = false;
}
return result;
}

跟入resumeTopActivityInnerLocked

1
2
3
4
5
private boolean resumeTopActivityInnerLocked(ActivityRecord prev, ActivityOptions options) {
mStackSupervisor.startSpecificActivityLocked(next, true, false);
if (DEBUG_STACK) mStackSupervisor.validateTopActivitiesLocked();
return true;
}

代码太多只需要找到正确的入口,随后跟入ActivityStackSupervisor类型的startSpecificActivityLocked方法,

1
2
3
4
5
6
7
8
9
10
11
12
13
14
15
16
17
18
19
20
21
22
23
24
25
26
27
28
29
30
31
void startSpecificActivityLocked(ActivityRecord r,
boolean andResume, boolean checkConfig) {
// Is this activity's application already running?
ProcessRecord app = mService.getProcessRecordLocked(r.processName,
r.info.applicationInfo.uid, true);

r.task.stack.setLaunchTime(r);

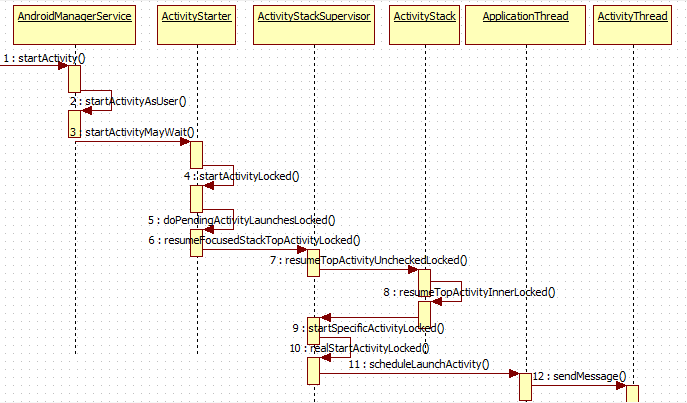
if (app != null && app.thread != null) {
try {
if ((r.info.flags&ActivityInfo.FLAG_MULTIPROCESS) == 0
|| !"android".equals(r.info.packageName)) {
// Don't add this if it is a platform component that is marked
// to run in multiple processes, because this is actually
// part of the framework so doesn't make sense to track as a
// separate apk in the process.
app.addPackage(r.info.packageName, r.info.applicationInfo.versionCode,
mService.mProcessStats);
}
realStartActivityLocked(r, app, andResume, checkConfig);
return;
} catch (RemoteException e) {
Slog.w(TAG, "Exception when starting activity "
+ r.intent.getComponent().flattenToShortString(), e);
}
// If a dead object exception was thrown -- fall through to
// restart the application.
}
mService.startProcessLocked(r.processName, r.info.applicationInfo, true, 0,
"activity", r.intent.getComponent(), false, false, true);
}

跟入realStartActivityLocked方法

1
2
3
4
5
6
7
8
9
10
final boolean realStartActivityLocked(ActivityRecord r, ProcessRecord app,
boolean andResume, boolean checkConfig) throws RemoteException {
...
app.thread.scheduleLaunchActivity(new Intent(r.intent), r.appToken,
System.identityHashCode(r), r.info, new Configuration(mService.mConfiguration),
new Configuration(task.mOverrideConfig), r.compat, r.launchedFromPackage,
task.voiceInteractor, app.repProcState, r.icicle, r.persistentState, results,
newIntents, !andResume, mService.isNextTransitionForward(), profilerInfo);
...
}

到这里我们已经到了关键的ApplicationThread调用scheduleLaunchActivity方法,这里的app.thread指的是IApplicationThread,ApplicationThread实现了ApplicationThreadNative,而ApplicationThreadNative继承了Binder实现了IApplicationThread。

1
2
3
4
5
6
7
8
9
10
11
12
13
14
15
16
17
18
19
20
21
22
23
24
25
26
27
@Override
public final void scheduleLaunchActivity(Intent intent, IBinder token, int ident,
ActivityInfo info, Configuration curConfig, Configuration overrideConfig,
CompatibilityInfo compatInfo, String referrer, IVoiceInteractor voiceInteractor,
int procState, Bundle state, PersistableBundle persistentState,
List<ResultInfo> pendingResults, List<ReferrerIntent> pendingNewIntents,
boolean notResumed, boolean isForward, ProfilerInfo profilerInfo) {
updateProcessState(procState, false);
ActivityClientRecord r = new ActivityClientRecord();
r.token = token;
r.ident = ident;
r.intent = intent;
r.referrer = referrer;
r.voiceInteractor = voiceInteractor;
r.activityInfo = info;
r.compatInfo = compatInfo;
r.state = state;
r.persistentState = persistentState;
r.pendingResults = pendingResults;
r.pendingIntents = pendingNewIntents;
r.startsNotResumed = notResumed;
r.isForward = isForward;
r.profilerInfo = profilerInfo;
r.overrideConfig = overrideConfig;
updatePendingConfiguration(curConfig);
sendMessage(H.LAUNCH_ACTIVITY, r);
}

然后将数据封装成了ActivityClientRecord通过Hanler传递了出去。找到H这个内部类并找到LAUNCH_ACTIVITY消息

1
2
3
4
5
6
7
8
9
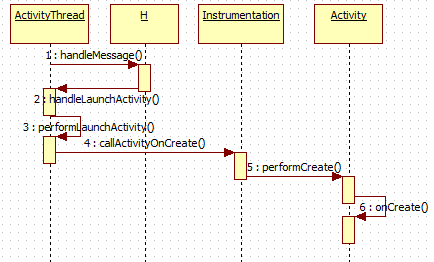
case LAUNCH_ACTIVITY: {
Trace.traceBegin(Trace.TRACE_TAG_ACTIVITY_MANAGER, "activityStart");
final ActivityClientRecord r = (ActivityClientRecord) msg.obj;

r.packageInfo = getPackageInfoNoCheck(
r.activityInfo.applicationInfo, r.compatInfo);
handleLaunchActivity(r, null, "LAUNCH_ACTIVITY");
Trace.traceEnd(Trace.TRACE_TAG_ACTIVITY_MANAGER);
} break;

接着跟进

1
2
3
4
5
6
7
8
9
10
11
12
13
14
15
16
17
18
19
20
21
22
23
24
25
26
27
28
29
30
31
32
33
34
35
36
37
38
39
40
41
42
43
private void handleLaunchActivity(ActivityClientRecord r, Intent customIntent, String reason) {
...
// Initialize before creating the activity
WindowManagerGlobal.initialize();

Activity a = performLaunchActivity(r, customIntent);
if (a != null) {
r.createdConfig = new Configuration(mConfiguration);
reportSizeConfigurations(r);
Bundle oldState = r.state;
handleResumeActivity(r.token, false, r.isForward,
!r.activity.mFinished && !r.startsNotResumed, r.lastProcessedSeq, reason);
if (!r.activity.mFinished && r.startsNotResumed) {
// The activity manager actually wants this one to start out paused, because it
// needs to be visible but isn't in the foreground. We accomplish this by going
// through the normal startup (because activities expect to go through onResume()
// the first time they run, before their window is displayed), and then pausing it.
// However, in this case we do -not- need to do the full pause cycle (of freezing
// and such) because the activity manager assumes it can just retain the current
// state it has.
performPauseActivityIfNeeded(r, reason);

// We need to keep around the original state, in case we need to be created again.
// But we only do this for pre-Honeycomb apps, which always save their state when
// pausing, so we can not have them save their state when restarting from a paused
// state. For HC and later, we want to (and can) let the state be saved as the
// normal part of stopping the activity.
if (r.isPreHoneycomb()) {
r.state = oldState;
}
}
} else {
// If there was an error, for any reason, tell the activity manager to stop us.
try {
ActivityManagerNative.getDefault()
.finishActivity(r.token, Activity.RESULT_CANCELED, null,
Activity.DONT_FINISH_TASK_WITH_ACTIVITY);
} catch (RemoteException ex) {
throw ex.rethrowFromSystemServer();
}
}
}
}

根据注释知道performLaunchActivity是启动Activity的,之后通过handleResumeActivity将状态变为resume。

1
2
3
4
5
6
7
8
9
10
11
12
13
14
15
16
17
18
19
20
21
22
23
24
25
26
27
28
29
30
31
32
33
34
35
36
37
38
39
private Activity performLaunchActivity(ActivityClientRecord r, Intent customIntent) {
···
Activity activity = null;
try {
java.lang.ClassLoader cl = r.packageInfo.getClassLoader();
activity = mInstrumentation.newActivity(
cl, component.getClassName(), r.intent);
StrictMode.incrementExpectedActivityCount(activity.getClass());
r.intent.setExtrasClassLoader(cl);
r.intent.prepareToEnterProcess();
if (r.state != null) {
r.state.setClassLoader(cl);
}
} catch (Exception e) {
if (!mInstrumentation.onException(activity, e)) {
throw new RuntimeException(
"Unable to instantiate activity " + component
+ ": " + e.toString(), e);
}
}
try {
Application app = r.packageInfo.makeApplication(false, mInstrumentation);
···
if (activity != null) {
Context appContext = createBaseContextForActivity(r, activity);
...
activity.attach(appContext, this, getInstrumentation(), r.token,
r.ident, app, r.intent, r.activityInfo, title, r.parent,
r.embeddedID, r.lastNonConfigurationInstances, config,
r.referrer, r.voiceInteractor, window);
···
if (r.isPersistable()) {
mInstrumentation.callActivityOnCreate(activity, r.state, r.persistentState);
} else {
mInstrumentation.callActivityOnCreate(activity, r.state);
}
···
return activity;
}

这里取出了一下关键点,通过mInstrumentation.newActivity创建了一个Activity,通过makeApplication创建了Application,通过createBaseContextForActivity获取了Context,这里activity.attach初始化了Activity,最后mInstrumentation.callActivityOnCreate启动了Activity。

1
2
3
4
5
6
public void callActivityOnCreate(Activity activity, Bundle icicle,
PersistableBundle persistentState) {
prePerformCreate(activity);
activity.performCreate(icicle, persistentState);
postPerformCreate(activity);
}

通过activity调用了其performCreate方法

1
2
3
4
5
6
final void performCreate(Bundle icicle) {
restoreHasCurrentPermissionRequest(icicle);
onCreate(icicle);
mActivityTransitionState.readState(icicle);
performCreateCommon();
}

到这里整个Activity启动流程就算结束了,最后附上流程图加以理解。
启动流程第二部分
启动流程第二部分

结束

整个流程看起来还是挺累,有时间还得再细细啃来。