前言 紧跟上一篇,东西之前就写好了,由于忙着忘了发了,接下来继续我们Activity启动流程。
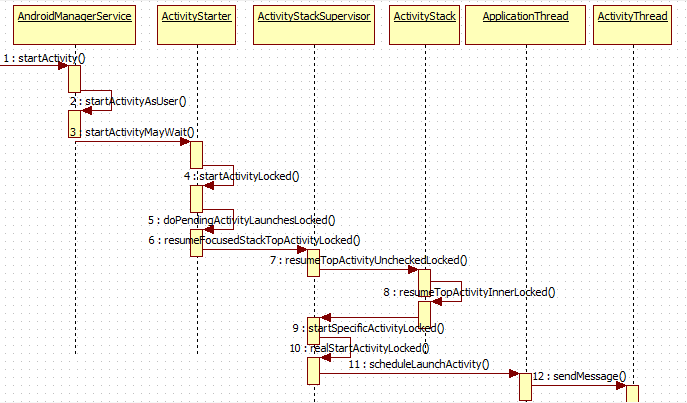
正文 上次分析到调用了AMS(AndroidManagerService)中的startActivity
1 2 3 4 5 6 7 8 @Override public final int startActivity (IApplicationThread caller, String callingPackage, Intent intent, String resolvedType, IBinder resultTo, String resultWho, int requestCode, int startFlags, ProfilerInfo profilerInfo, Bundle bOptions) return startActivityAsUser (caller, callingPackage, intent, resolvedType, resultTo, resultWho, requestCode, startFlags, profilerInfo, bOptions, UserHandle.getCallingUserId ()); }
之后经历了startActivityAsUser,
1
2
3
4
5
6
7
8
9
10
11
12
@Override public final int startActivityAsUser (IApplicationThread caller, String callingPackage, Intent intent, String resolvedType, IBinder resultTo, String resultWho, int requestCode, int startFlags, ProfilerInfo profilerInfo, Bundle bOptions, int userId) enforceNotIsolatedCaller("startActivity" ); userId = mUserController.handleIncomingUser(Binder.getCallingPid(), Binder.getCallingUid(), userId, false , ALLOW_FULL_ONLY, "startActivity" , null ); return mActivityStarter.startActivityMayWait (caller, -1 , callingPackage, intent, resolvedType, null , null , resultTo, resultWho, requestCode, startFlags, profilerInfo, null , null , bOptions, false , userId, null , null ) }
接着调用了mActivityStarter(ActivityStarter)的startActivityMayWait,
1
2
3
4
5
6
7
8
9
10
11
12
13
14
15
16
17
18
19
20
21
22
23
24
final int startActivityMayWait (IApplicationThread caller, int callingUid, String callingPackage, Intent intent, String resolvedType, IVoiceInteractionSession voiceSession, IVoiceInteractor voiceInteractor, IBinder resultTo, String resultWho, int requestCode, int startFlags, ProfilerInfo profilerInfo, IActivityManager.WaitResult outResult, Configuration config, Bundle bOptions, boolean ignoreTargetSecurity, int userId, IActivityContainer iContainer, TaskRecord inTask) ...省略 final ActivityRecord[] outRecord = new ActivityRecord[1 ]; int res = startActivityLocked (caller, intent, ephemeralIntent, resolvedType, aInfo, rInfo, voiceSession, voiceInteractor, resultTo, resultWho, requestCode, callingPid, callingUid, callingPackage, realCallingPid, realCallingUid, startFlags, options, ignoreTargetSecurity, componentSpecified, outRecord, container, inTask); Binder.restoreCallingIdentity (origId); ...省略 return res; } }
紧接着找到正确的调用startActivityLocked
1
2
3
4
5
6
7
8
9
10
11
12
13
final int startActivityLocked (IApplicationThread caller, Intent intent, Intent ephemeralIntent, String resolvedType, ActivityInfo aInfo, ResolveInfo rInfo, IVoiceInteractionSession voiceSession, IVoiceInteractor voiceInteractor, IBinder resultTo, String resultWho, int requestCode, int callingPid, int callingUid, String callingPackage, int realCallingPid, int realCallingUid, int startFlags, ActivityOptions options, boolean ignoreTargetSecurity, boolean componentSpecified, ActivityRecord[] outActivity, ActivityStackSupervisor.ActivityContainer container, TaskRecord inTask) ... doPendingActivityLaunchesLocked (false ); ... return err }
找正确的点之后继续跟进doPendingActivityLaunchesLocked
1
2
3
4
5
6
7
8
final void doPendingActivityLaunchesLocked (boolean doResume) ... if (mDoResume) { mSupervisor.resumeFocusedStackTopActivityLocked (); } ... return START_SUCCESS; }
mSupervisor即ActivityStackSupervisor类型调用了resumeFocusedStackTopActivityLocked,
1
2
3
boolean resumeFocusedStackTopActivityLocked () return resumeFocusedStackTopActivityLocked (null , null , null ) }
1
2
3
4
5
6
7
8
9
10
11
boolean resumeFocusedStackTopActivityLocked ( ActivityStack targetStack, ActivityRecord target , ActivityOptions targetOptions) if (targetStack != null && isFocusedStack(targetStack)) { return targetStack.resumeTopActivityUncheckedLocked (target , targetOptions) } final ActivityRecord r = mFocusedStack.topRunningActivityLocked(); if (r == null || r.state != RESUMED) { mFocusedStack.resumeTopActivityUncheckedLocked(null , null ); } return false ; }
之后又调用了ActivityStack类型mFocusedStack的resumeTopActivityUncheckedLocked方法
1
2
3
4
5
6
7
8
9
10
11
12
13
14
15
16
17
18
19
20
boolean resumeTopActivityUncheckedLocked(ActivityRecord prev, ActivityOptions options ) { if (mStackSupervisor.inResumeTopActivity) { return false ; } boolean result = false ; try { mStackSupervisor.inResumeTopActivity = true ; if (mService.mLockScreenShown == ActivityManagerService.LOCK_SCREEN_LEAVING) { mService.mLockScreenShown = ActivityManagerService.LOCK_SCREEN_HIDDEN; mService.updateSleepIfNeededLocked(); } result = resumeTopActivityInnerLocked(prev, options ); } finally { mStackSupervisor.inResumeTopActivity = false ; } return result; }
跟入resumeTopActivityInnerLocked
1
2
3
4
5
private boolean resumeTopActivityInnerLocked(ActivityRecord prev , ActivityOptions options ) { mStackSupervisor.startSpecificActivityLocked(next , true , false ) ; if (DEBUG_STACK) mStackSupervisor.validateTopActivitiesLocked() ; return true ; }
代码太多只需要找到正确的入口,随后跟入ActivityStackSupervisor类型的startSpecificActivityLocked方法,
1
2
3
4
5
6
7
8
9
10
11
12
13
14
15
16
17
18
19
20
21
22
23
24
25
26
27
28
29
30
31
void startSpecificActivityLocked(ActivityRecord r, boolean andResume, boolean checkConfig) { ProcessRecord app = mService.getProcessRecordLocked(r.processName, r.info.applicationInfo.uid, true ); r.task.stack .setLaunchTime(r); if (app != null && app.thread != null ) { try { if ((r.info.flags&ActivityInfo.FLAG_MULTIPROCESS) == 0 || !"android" .equals (r.info.packageName)) { app.addPackage(r.info.packageName, r.info.applicationInfo.versionCode, mService.mProcessStats); } realStartActivityLocked(r, app, andResume, checkConfig); return ; } catch (RemoteException e) { Slog.w(TAG , "Exception when starting activity " + r.intent.getComponent().flattenToShortString(), e); } } mService.startProcessLocked(r.processName, r.info.applicationInfo, true , 0 , "activity" , r.intent.getComponent(), false , false , true ); }
跟入realStartActivityLocked方法
1
2
3
4
5
6
7
8
9
10
final boolean realStartActivityLocked(ActivityRecord r, ProcessRecord app, boolean andResume, boolean checkConfig) throws RemoteException { ... app.thread.scheduleLaunchActivity(new Intent(r.intent), r.appToken, System.identityHashCode(r), r.info, new Configuration(mService.mConfiguration), new Configuration(task .mOverrideConfig), r.compat, r.launchedFromPackage, task .voiceInteractor, app.repProcState, r.icicle, r.persistentState, results, newIntents, !andResume, mService.isNextTransitionForward(), profilerInfo); ... }
到这里我们已经到了关键的ApplicationThread调用scheduleLaunchActivity方法,这里的app.thread指的是IApplicationThread,ApplicationThread实现了ApplicationThreadNative,而ApplicationThreadNative继承了Binder实现了IApplicationThread。
1
2
3
4
5
6
7
8
9
10
11
12
13
14
15
16
17
18
19
20
21
22
23
24
25
26
27
@Override public final void scheduleLaunchActivity(Intent intent, IBinder token, int ident, ActivityInfo info, Configuration curConfig, Configuration overrideConfig, CompatibilityInfo compatInfo, String referrer, IVoiceInteractor voiceInteractor, int procState, Bundle state, PersistableBundle persistentState, List<ResultInfo> pendingResults, List<ReferrerIntent> pendingNewIntents, boolean notResumed, boolean isForward, ProfilerInfo profilerInfo) { updateProcessState(procState, false ); ActivityClientRecord r = new ActivityClientRecord(); r.token = token; r.ident = ident; r.intent = intent; r.referrer = referrer; r.voiceInteractor = voiceInteractor; r.activityInfo = info; r.compatInfo = compatInfo; r.state = state; r.persistentState = persistentState; r.pendingResults = pendingResults; r.pendingIntents = pendingNewIntents; r.startsNotResumed = notResumed; r.isForward = isForward; r.profilerInfo = profilerInfo; r.overrideConfig = overrideConfig; updatePendingConfiguration(curConfig); sendMessage(H.LAUNCH_ACTIVITY, r); }
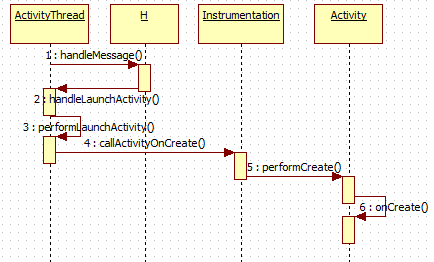
然后将数据封装成了ActivityClientRecord通过Hanler传递了出去。找到H这个内部类并找到LAUNCH_ACTIVITY消息
1
2
3
4
5
6
7
8
9
case LAUNCH_ACTIVITY: { Trace.traceBegin(Trace.TRACE_TAG_ACTIVITY_MANAGER, "activityStart" ); final ActivityClientRecord r = (ActivityClientRecord) msg.obj; r.packageInfo = getPackageInfoNoCheck( r.activityInfo.applicationInfo, r.compatInfo); handleLaunchActivity(r, null , "LAUNCH_ACTIVITY" ); Trace.traceEnd(Trace.TRACE_TAG_ACTIVITY_MANAGER); } break ;
接着跟进
1
2
3
4
5
6
7
8
9
10
11
12
13
14
15
16
17
18
19
20
21
22
23
24
25
26
27
28
29
30
31
32
33
34
35
36
37
38
39
40
41
42
43
private void handleLaunchActivity(ActivityClientRecord r, Intent customIntent, String reason) { ... // Initialize before creating the activity WindowManagerGlobal.initialize(); Activity a = performLaunchActivity(r, customIntent); if (a != null) { r.createdConfig = new Configuration(mConfiguration); reportSizeConfigurations(r); Bundle oldState = r.state ; handleResumeActivity(r.token, false, r.isForward, !r.activity.mFinished && !r.startsNotResumed, r.lastProcessedSeq, reason); if (!r.activity.mFinished && r.startsNotResumed) { // The activity manager actually wants this one to start out paused, because it // needs to be visible but isn't in the foreground. We accomplish this by going // through the normal startup (because activities expect to go through on Resume() // the first time they run, before their window is displayed), and then pausing it. // However, in this case we do -not- need to do the full pause cycle (of freezing // and such) because the activity manager assumes it can just retain the current // state it has. performPauseActivityIfNeeded(r, reason); // We need to keep around the original state , in case we need to be created again. // But we only do this for pre-Honeycomb apps, which always save their state when // pausing, so we can not have them save their state when restarting from a paused // state . For HC and later, we want to (and can) let the state be saved as the // normal part of stopping the activity. if (r.isPreHoneycomb()) { r.state = oldState; } } } else { // If there was an error, for any reason, tell the activity manager to stop us. try { ActivityManagerNative.getDefault() .finishActivity(r.token, Activity.RESULT_CANCELED, null, Activity.DONT_FINISH_TASK_WITH_ACTIVITY); } catch (RemoteException ex) { throw ex.rethrowFromSystemServer(); } } } }
根据注释知道performLaunchActivity是启动Activity的,之后通过handleResumeActivity将状态变为resume。
1
2
3
4
5
6
7
8
9
10
11
12
13
14
15
16
17
18
19
20
21
22
23
24
25
26
27
28
29
30
31
32
33
34
35
36
37
38
39
private Activity performLaunchActivity(ActivityClientRecord r, Intent customIntent) { ··· Activity activity = null; try { java.lang.ClassLoader cl = r.packageInfo.getClassLoader(); activity = mInstrumentation.newActivity( cl, component.getClassName(), r.intent); StrictMode.incrementExpectedActivityCount(activity.getClass()); r.intent.set ExtrasClassLoader(cl); r.intent.prepareToEnterProcess(); if (r.state != null) { r.state .set ClassLoader(cl); } } catch (Exception e) { if (!mInstrumentation.on Exception(activity, e)) { throw new RuntimeException( "Unable to instantiate activity " + component + ": " + e.to String(), e); } } try { Application app = r.packageInfo.makeApplication(false, mInstrumentation); ··· if (activity != null) { Context appContext = createBaseContextForActivity(r, activity); ... activity.attach(appContext, this, getInstrumentation(), r.token, r.ident, app, r.intent, r.activityInfo, title, r.parent , r.embeddedID, r.lastNon ConfigurationInstances, config, r.referrer, r.voiceInteractor, window); ··· if (r.isPersistable()) { mInstrumentation.callActivityOnCreate(activity, r.state , r.persistentState); } else { mInstrumentation.callActivityOnCreate(activity, r.state ); } ··· return activity; }
这里取出了一下关键点,通过mInstrumentation.newActivity创建了一个Activity,通过makeApplication创建了Application,通过createBaseContextForActivity获取了Context,这里activity.attach初始化了Activity,最后mInstrumentation.callActivityOnCreate启动了Activity。
1
2
3
4
5
6
public void callActivityOnCreate (Activity activity, Bundle icicle, PersistableBundle persistentState) { prePerformCreate (activity); activity .performCreate (icicle, persistentState); postPerformCreate (activity); }
通过activity调用了其performCreate方法
1
2
3
4
5
6
final void performCreate(Bundle icicle ) { restoreHasCurrentPermissionRequest(icicle ) ; onCreate(icicle ) ; mActivityTransitionState.readState(icicle ) ; performCreateCommon() ; }
到这里整个Activity启动流程就算结束了,最后附上流程图加以理解。
结束 整个流程看起来还是挺累,有时间还得再细细啃来。